Documentation and Guides
This page contains a collection of guides. Use the menu on the left to navigate between topics. On smaller screens, the menu becomes a mobile drawer. The dark mode button switches the whole page theme.
Download CREB-Toolkit from CodebergGetting Started
This guide is made to help you install and configure the following:
- Install an OS on Raspberry Pi with an NVME HAT and boot from it.
- Install and configure Docker with runc and runsc.
- Install and configure Podman with crun and runsc.
- Install and configure Nerdctl with kata and kata with Firecracker.
- Configure & run (CREB) Container Runtime Evaluation Benchmarking Toolkit.
- Configure Benchmarkserver.
Purpose
This guide will help you to overcome the problems with the parallel configuration of different low-level runtimes and their cli-management-tools and save A LOT OF TIME! It is also a guide for using the CREB Tool that I made to benchmark different low-level runtimes that they are using different isolation mechanisms. Is the security, coming with a b1g performance drawback or not? 😊
Very important to 📝 (n0tice)
This page is still under construction and is going to be edited multiple times.
Configuration ❗
I followed this steps in between 2025 and 2026 for the installation and configuration of those specific low-level runtimes (runc, crun, runsc, kata-qemu & kata-fc). For using them and configure them I used different cli-management-tools such as: Docker, Podman & Nerdctl Depending on the year that you are reading this, there is a possibility that somethings changed or need further/different configuration. Consider that, before you START!
Installation OS on Pi
1) First go and download the Raspberry Pi Imager, then choose the sd card to flash the operating system!
Download Raspberry Pi Imager here: Raspberry Pi Imager
Over the installation steps, consider to enable ssh
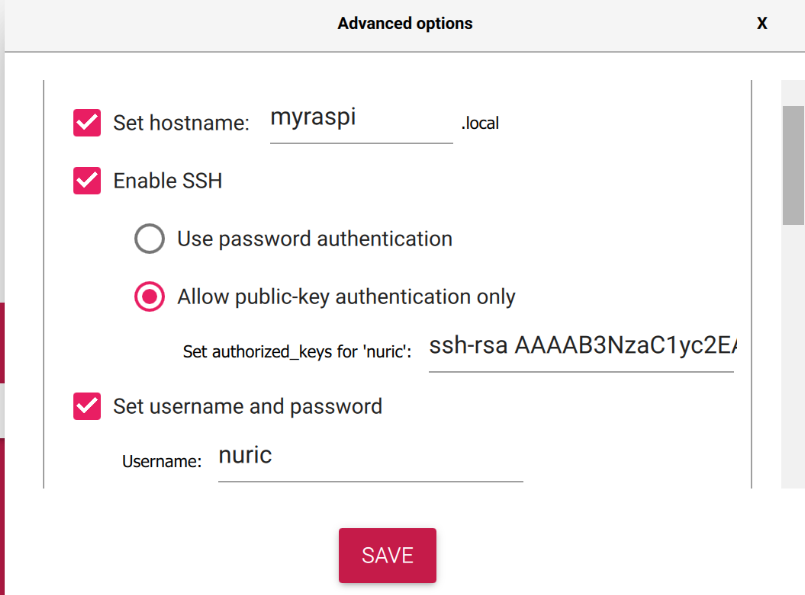
2) After installing the selected operating system, you need to edit the firmware folder of the rasppery pi operating system.
sudo nano /boot/firmware/config.txt3) To enable PCI-Express for the NVMe-drive you need to add the following:
[all]
        dtparam=nvme
        dtparam=pciex1_gen=3
4) Reboot the system...
sudo reboot5) Check after reboot, if the PC-Express is activated:

6) Show all the drivers
lsblk
6) Format the NVME with fdisk tool.
sudo fdisk /dev/nvme0n1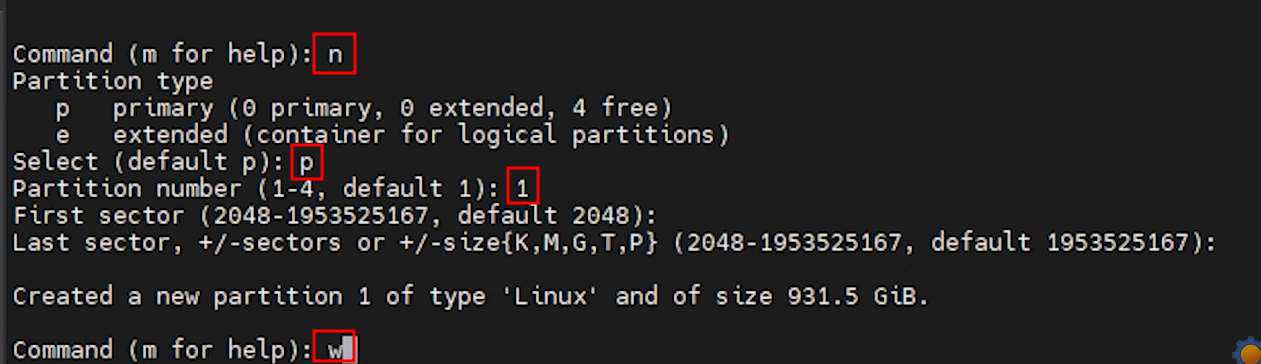
7) After that run again the same command to check if the disk is formmated lsblk.
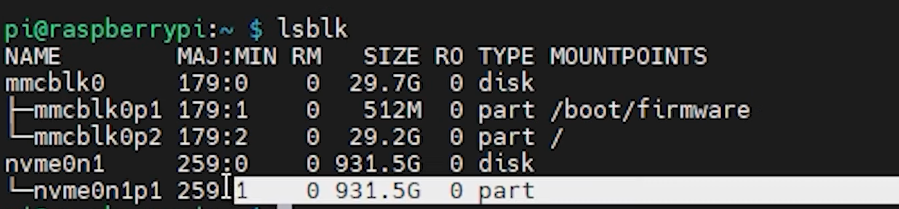
8) There is a possibility to install somethings that are needed in specific distros (e.g Ubuntu Server)
sudo apt-get install raspi-config9) There is a high possibility that the menu is not shown in different flavours or variations of the operating system. Then we need to edit the boot order manually over some commands. This was my case with the official ubuntu 22.04-server-cli edition. So the first step is to update the eeprom!
sudo rpi-eeprom-update10) The next step is to check if the bootloader is up2date...
BCM2711 detected
VL805 firmware in bootloader EEPROM
BOOTLOADER: up to date
⚠️ In case when eeprom is not installed we do the following steps:
sudo apt update
sudo apt install rpi-eeprom -y
sudo rpi-eeprom-update -asudo apt update
sudo apt install rpi-eeprom -y
sudo rpi-eeprom-update -a
After this we reboot.
sudo rebootWe edit the Bootorder to include the NVME/Usb.
sudo -E rpi-eeprom-config --edit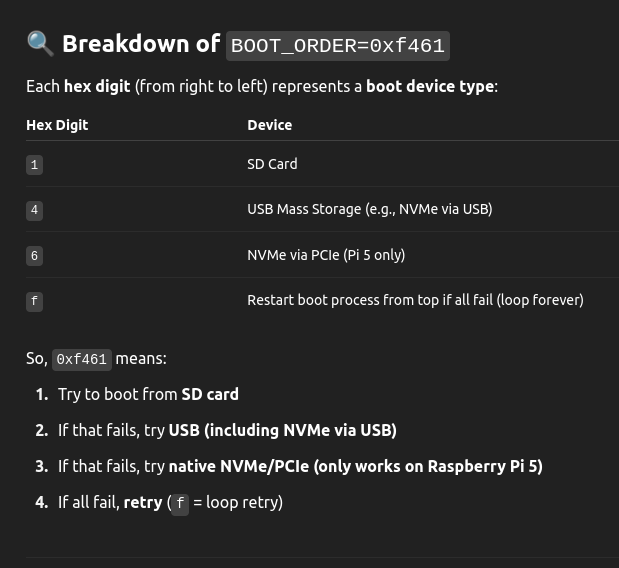
Then we edit the BOOT_ORDER as following:
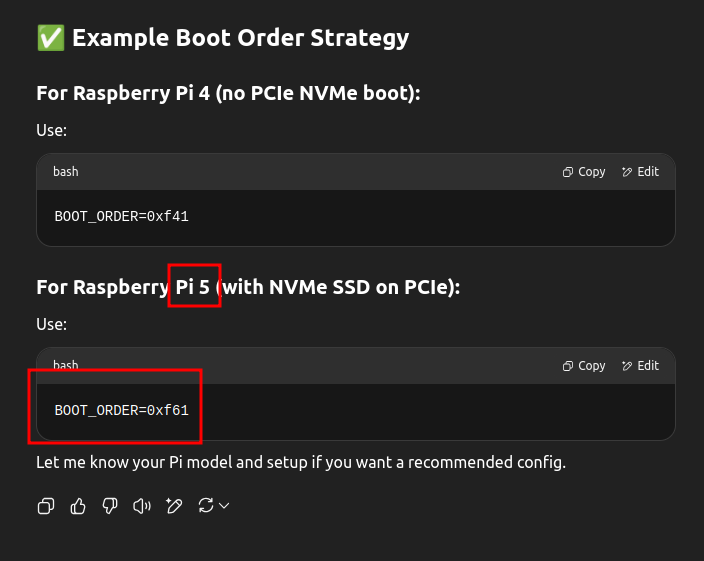
⚠️ WE DONT RESTART THE RASPERRY PI! ⚠️
We use dd to flash the content (operating system) from sd-card into nvme ssd disk.
sudo dd if=/dev/mmcblk0 of=/dev/nvme0n1 bs=4MB status=progressIt will probably take like 10 Minutes depending on the copy speed.

Then we restart and use lsblk to check if the operating system is flashed into nvme.
sudo rpi-eeprom-update -asudo rebootAfter reboot we check with lsblk:
lsblk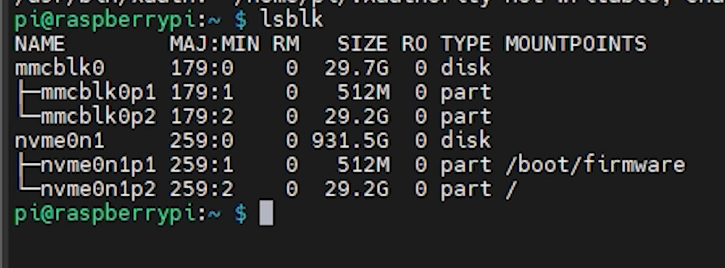
Usefull links, that could help:
More information: Install raspi-config on Ubuntu 22.04.1 LTS
Install Docker
More information: Install Docker on Debian
# Add Docker's official GPG key:
sudo apt update
sudo apt install ca-certificates curl
sudo install -m 0755 -d /etc/apt/keyrings
sudo curl -fsSL https://download.docker.com/linux/debian/gpg -o /etc/apt/keyrings/docker.asc
sudo chmod a+r /etc/apt/keyrings/docker.asc

# Add the repository to Apt sources:
sudo tee /etc/apt/sources.list.d/docker.sources <<EOF
Types: deb
URIs: https://download.docker.com/linux/debian
Suites: $(. /etc/os-release && echo "$VERSION_CODENAME")
Components: stable
Architectures: $(dpkg --print-architecture)
Signed-By: /etc/apt/keyrings/docker.asc
EOF

sudo apt update
After doing the first step then you need to install the following:
sudo apt install docker-ce docker-ce-cli containerd.io docker-buildx-plugin docker-compose-pluginTo test if anything is working you can start the hello-world container!
sudo docker run hello-worldAlso to check Dockerversion and installed runtime:
docker --versionInstall gVisor
Use this section to install and configure gVisor (runsc).
First of all create a folder and acess it:
mkdir install_gvisorcd install_gvisorCreate a script with vim or nano and copy the following code:
sudo nano install_gvisor.sh(
set -e
ARCH=$(uname -m)
URL=https://storage.googleapis.com/gvisor/releases/release/latest/${ARCH}
wget ${URL}/runsc ${URL}/runsc.sha512 \
${URL}/containerd-shim-runsc-v1 ${URL}/containerd-shim-runsc-v1.sha512
sha512sum -c runsc.sha512 \
-c containerd-shim-runsc-v1.sha512
rm -f *.sha512
chmod a+rx runsc containerd-shim-runsc-v1
sudo mv runsc containerd-shim-runsc-v1 /usr/local/bin
)To run the script you need to give the needed rights:
chmod +x install_gvisor.shTo install gVisor as a Docker runtime, run the following commands:
/usr/local/bin/runsc install
sudo systemctl reload docker
To check if the runtime was properly intalled and works with docker, you can run the following commadn:
docker run --rm --runtime=runsc hello-worldAlso to check the installed version of gVisor/runsc, you can do the follow:
runsc --versionOkay, because sometimes nothing works out of the box or as you planned, the following steps needed to be made in the following order to run gVisor on the rasperry pi!
⚠️ Consider to follow the steps, only if you are using the rasperry pi! ⚠️
In order for the new low-level runtime to work, we need to edit the following file:
sudo nano /boot/firmware/cmdline.txt** On some distros, it might be `/boot/cmdline.txt` — check which one exists.
Inside it, will have the following line:
cgroup_enable=cpuset cgroup_enable=memory cgroup_memory=1But we need to edit and write the following in a single line:
console=serial0,115200 console=tty1 root=LABEL=writable rootfstype=ext4 elevator=deadline fsck.repair=yes rootwait cgroup_enable=cpuset cgroup_enable=memory cgroup_memory=1Then we need to restart:
sudo rebootCheck if everything works with the following commands:
ls /sys/fs/cgroup/memory/cat /proc/cgroups | grep memorysudo docker info | grep -i cgroupInstall Podman
We start by installing podman with the following command:
sudo apt-get -y install podmanTo check if Podman works and is properly installed:
sudo podman run --rm hello-worldCheck Podmansversion:
podman --versionOkay, in some cases ofc, because life is not easy, the crun is not installed and Podman is going to use the default installed, most of the time runc as main runtime.
To overcome this problem we are going to install also crun, to be sure for 3v3ryth1n...
sudo apt update
sudo apt install -y crun
To check that everything is installed:
which crun
crun --version
Then it returns:
/usr/bin/crunWe can check if Podman sees the runtime without any further problems:
podman info | grep -A20 "ociRuntime"or with:
podman infoIf it is not listed, we need probably to add it manually...
sudo nano /etc/containers/containers.confThen we edit the file and we add the following:
[engine.runtimes]
crun = ["/usr/bin/crun"]
runc = ["/usr/bin/runc"]
runsc = ["/usr/bin/runsc"]
Then we can do some tests and try to start containers with different low-level runtimes:
podman run --runtime=crun --rm hello-worldpodman run --runtime=runc --rm hello-worldpodman run --runtime=runsc --rm hello-worldAfter the containers are started we can inspect them likeso:
sudo podman inspect <container_name> | grep -i runtimeOr you can make a script like:
sudo nano show_runtime_podman.shfor cid in $(podman ps -q); do
echo "▶ Container: $cid"
echo "Runtime: $(podman inspect --format '{{.OCIRuntime}}' $cid)"
echo "Environment:"
podman inspect --format '{{range .Config.Env}}{{println .}}{{end}}' $cid
echo "--------------------------------------"
doneGive the rights...
sudo chmod +x show_runtime_podman.shAnd just run it:
./show_runtime_podman.sh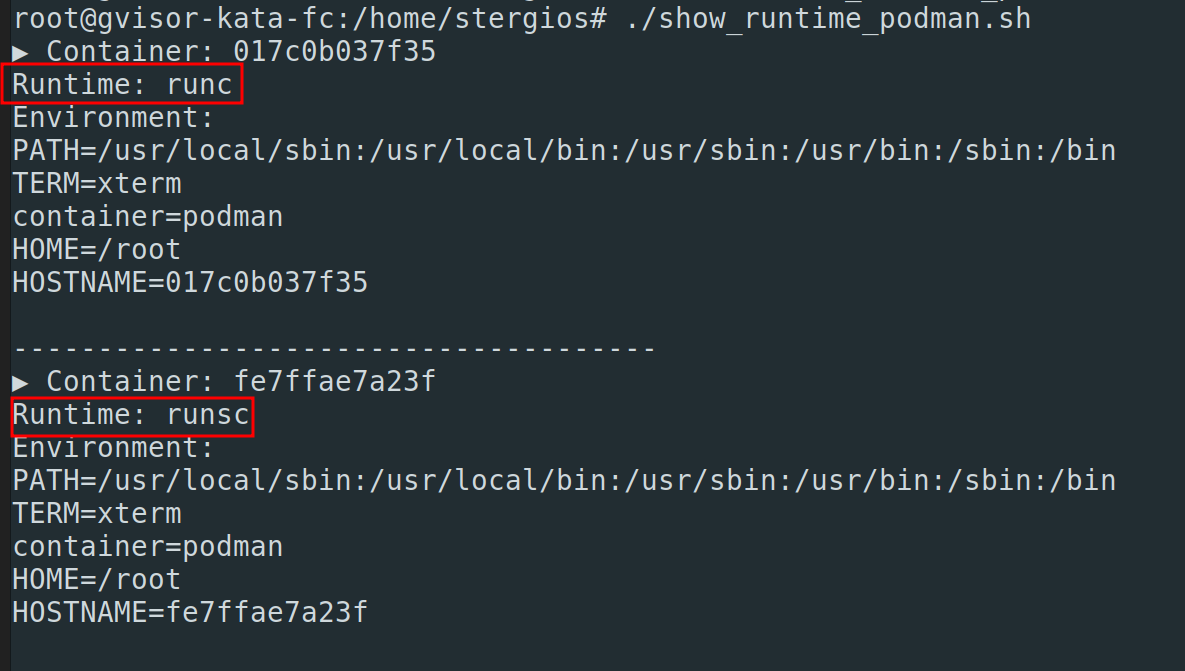
To stop all the test running containers:
podman stop $(podman ps -q)Install Nerdctl
More information: Install Kata-Runtime
The first step is to download the following script with wget:
wget https://raw.githubusercontent.com/kata-containers/kata-containers/main/utils/kata-manager.shWhen: containerd is already installed!
chmod +x kata-manager.sh -o Or install kata with nerdctl:
chmod +x kata-manager.sh -N Okay, lets test it:
sudo nerdctl run --rm -it --runtime=io.containerd.kata.v2 alpine shAlso some usefull commands:
./kata-manager.sh -L # (Lists all Runtime-Environments)

./kata-manager.sh -S # (sets Runtime-Environment)

./kata-manager.sh -T # (Runs the Tests for the Environment!)
The next step is to configure kata to be compatible with Firecracker, which is a minimal virtual machine monitor to create microVMS.
More information: Install Firecraker
The first step is to generate a shell script and run the following commands:
mkdir install_fc
cd install_fc
sudo nano install_fc_jail.sh
release_url="https://github.com/firecracker-microvm/firecracker/releases"
version=$(yq read /versions.yaml assets.hypervisor.firecracker.version)
arch=`uname -m`
curl ${release_url}/download/${version}/firecracker-${version}-${arch} -o firecracker
curl ${release_url}/download/${version}/jailer-${version}-${arch} -o jailer
chmod +x jailer firecracker And then:
sudo chmod +x install_fc_jail.sh
./install_fc_jail.sh
The next step is to make the binaries available to PATH
sudo ln -s $(pwd)/firecracker /usr/local/bin
sudo ln -s $(pwd)/jailer /usr/local/bin
The next step is to configure the devmapper!
if we run the command we will receive most of the time the following result.
sudo ctr plugins ls |grep devmapper
To overcome this we need to setup the devmapper for this device.
Note: The following scripts assume a 100G sparse file for storing container images, a 10G sparse file for the thin-provisioning pool and 10G base image files for any sandboxed container created. This means that we will need at least 10GB free space.
#!/bin/bash
set -ex

DATA_DIR=/var/lib/containerd/devmapper
POOL_NAME=devpool

mkdir -p ${DATA_DIR}

# Create data file
sudo touch "${DATA_DIR}/data"
sudo truncate -s 100G "${DATA_DIR}/data"

# Create metadata file
sudo touch "${DATA_DIR}/meta"
sudo truncate -s 10G "${DATA_DIR}/meta"

# Allocate loop devices
DATA_DEV=$(sudo losetup --find --show "${DATA_DIR}/data")
META_DEV=$(sudo losetup --find --show "${DATA_DIR}/meta")

# Define thin-pool parameters.
# See https://www.kernel.org/doc/Documentation/device-mapper/thin-provisioning.txt for details.
SECTOR_SIZE=512
DATA_SIZE="$(sudo blockdev --getsize64 -q ${DATA_DEV})"
LENGTH_IN_SECTORS=$(bc <<< "${DATA_SIZE}/${SECTOR_SIZE}")
DATA_BLOCK_SIZE=128
LOW_WATER_MARK=32768

# Create a thin-pool device
sudo dmsetup create "${POOL_NAME}" \
    --table "0 ${LENGTH_IN_SECTORS} thin-pool ${META_DEV} ${DATA_DEV} ${DATA_BLOCK_SIZE} ${LOW_WATER_MARK}"

cat << EOF
#
# Add this to your config.toml configuration file and restart containerd daemon
#
[plugins]
  [plugins.devmapper]
    pool_name = "${POOL_NAME}"
    root_path = "${DATA_DIR}"
    base_image_size = "10GB"
    discard_blocks = true
EOF
We restart the containterd !
sudo systemctl restart containerdAnd then we edit the following config.toml file!
sudo nano /etc/containerd/config.toml[plugins]
[plugins.devmapper]
pool_name = "devpool"
root_path = "/var/lib/containerd/devmapper"
base_image_size = "10GB"
discard_blocks = trueThen we restart again the containerd!
sudo systemctl restart containerdWe can use `dmsetup` to verify that the thin-pool was created successfully.
sudo dmsetup lsWe should also check that `devmapper` is registered and running:
sudo ctr plugins ls | grep devmapper
This script needs to be run only once, while setting up the `devmapper` `snapshotter` for `containerd`. Afterwards, make sure that on each reboot, the thin-pool is initialized from the same data directory. Otherwise, all the fetched containers (or the ones that you have created) will be re-initialized. A simple script that re-creates the thin-pool from the same data directory is shown below:
sudo nano reload.sh
sudo cmod +x reload.sh
sudo pwd # gives me /home/stergios/install_firecracker/
#!/bin/bash
set -ex
DATA_DIR=/var/lib/containerd/devmapper
POOL_NAME=devpool
# Allocate loop devices
DATA_DEV=$(sudo losetup --find --show "${DATA_DIR}/data")
META_DEV=$(sudo losetup --find --show "${DATA_DIR}/meta")
# Define thin-pool parameters.
# See https://www.kernel.org/doc/Documentation/device-mapper/thin-provisioning.txt for details.
SECTOR_SIZE=512
DATA_SIZE="$(sudo blockdev --getsize64 -q ${DATA_DEV})"
LENGTH_IN_SECTORS=$(bc <<< "${DATA_SIZE}/${SECTOR_SIZE}")
DATA_BLOCK_SIZE=128
LOW_WATER_MARK=32768
# Create a thin-pool device
sudo dmsetup create "${POOL_NAME}" \
--table "0 ${LENGTH_IN_SECTORS} thin-pool ${META_DEV} ${DATA_DEV} ${DATA_BLOCK_SIZE} ${LOW_WATER_MARK}"We can create a systemd service to run the above script on each reboot:
sudo nano /lib/systemd/system/devmapper_reload.serviceThe service file:
[Unit]
Description=Devmapper reload script

[Service]
ExecStart=/home/stergios/install_firecracker/reload.sh

[Install]
WantedBy=multi-user.target
Enable the newly created service:
sudo systemctl daemon-reload
sudo systemctl enable devmapper_reload.service
sudo systemctl start devmapper_reload.service
⚠️ alternative start, this example refered to a total of 32 GB disk, that I tried in an VM inside my proxmox appliance and worked.
#!/bin/bash
set -ex

DATA_DIR=/var/lib/containerd/devmapper
POOL_NAME=devpool
CONFIG_FILE="/etc/containerd/config.toml"

# Create devmapper storage files (safe for 32GB total disk)
mkdir -p "${DATA_DIR}"

sudo touch "${DATA_DIR}/data"
sudo truncate -s 15G "${DATA_DIR}/data"

sudo touch "${DATA_DIR}/meta"
sudo truncate -s 1G "${DATA_DIR}/meta"

# Allocate loop devices
DATA_DEV=$(sudo losetup --find --show "${DATA_DIR}/data")
META_DEV=$(sudo losetup --find --show "${DATA_DIR}/meta")

# Thin pool settings
SECTOR_SIZE=512
DATA_SIZE="$(sudo blockdev --getsize64 -q ${DATA_DEV})"
LENGTH_IN_SECTORS=$(bc <<< "${DATA_SIZE}/${SECTOR_SIZE}")
DATA_BLOCK_SIZE=128
LOW_WATER_MARK=32768

# Create thin-pool device
sudo dmsetup create "${POOL_NAME}" \
  --table "0 ${LENGTH_IN_SECTORS} thin-pool ${META_DEV} ${DATA_DEV} ${DATA_BLOCK_SIZE} ${LOW_WATER_MARK}"

# Ensure config.toml exists
if [ ! -f "$CONFIG_FILE" ]; then
    sudo containerd config default | sudo tee "$CONFIG_FILE" > /dev/null
fi

# Backup original config
sudo cp "$CONFIG_FILE" "${CONFIG_FILE}.bak.$(date +%s)"

# Inject devmapper settings (replace/add plugins.devmapper block)
sudo sed -i '/\[plugins\.devmapper\]/,/^$/d' "$CONFIG_FILE"
cat << EOF | sudo tee -a "$CONFIG_FILE" > /dev/null

[plugins."io.containerd.snapshotter.v1.devmapper"]
  pool_name = "${POOL_NAME}"
  root_path = "${DATA_DIR}"
  base_image_size = "2GB"
  discard_blocks = true
EOF

# Restart containerd
sudo systemctl restart containerd

echo "Devmapper setup complete and containerd configured."
creates the thin_pool for only once, this creates also the thin_pool for the 32GB disk
#!/bin/bash
set -ex

DATA_DIR=/var/lib/containerd/devmapper
POOL_NAME=devpool

# Ensure devmapper files exist and are correctly sized
mkdir -p "${DATA_DIR}"

# Create or resize data file to 15G
sudo touch "${DATA_DIR}/data"
sudo truncate -s 15G "${DATA_DIR}/data"

# Create or resize metadata file to 1G
sudo touch "${DATA_DIR}/meta"
sudo truncate -s 1G "${DATA_DIR}/meta"

# Allocate loop devices
DATA_DEV=$(sudo losetup --find --show "${DATA_DIR}/data")
META_DEV=$(sudo losetup --find --show "${DATA_DIR}/meta")

# Define thin-pool parameters
SECTOR_SIZE=512
DATA_SIZE="$(sudo blockdev --getsize64 -q ${DATA_DEV})"
LENGTH_IN_SECTORS=$(bc <<< "${DATA_SIZE}/${SECTOR_SIZE}")
DATA_BLOCK_SIZE=128
LOW_WATER_MARK=32768

# Create a thin-pool device
sudo dmsetup create "${POOL_NAME}" \
  --table "0 ${LENGTH_IN_SECTORS} thin-pool ${META_DEV} ${DATA_DEV} ${DATA_BLOCK_SIZE} ${LOW_WATER_MARK}"

echo "Thin pool '${POOL_NAME}' created successfully using ${DATA_DEV} and ${META_DEV}."
Create script for auto mounting the devmapper:
Save this file as `/usr/local/bin/setup-devmapper-pool.sh`:
#!/bin/bash
set -e

DATA_DIR=/var/lib/containerd/devmapper
POOL_NAME=devpool

# Reattach loop devices if not already attached
[ -b /dev/loop0 ] || sudo losetup -f "${DATA_DIR}/data"
[ -b /dev/loop1 ] || sudo losetup -f "${DATA_DIR}/meta"

# Find actual loop device names
DATA_DEV=$(losetup -j "${DATA_DIR}/data" | cut -d: -f1)
META_DEV=$(losetup -j "${DATA_DIR}/meta" | cut -d: -f1)

# Recreate thin-pool
SECTOR_SIZE=512
DATA_SIZE="$(blockdev --getsize64 -q ${DATA_DEV})"
LENGTH_IN_SECTORS=$(bc <<< "${DATA_SIZE}/${SECTOR_SIZE}")
DATA_BLOCK_SIZE=128
LOW_WATER_MARK=32768

# Only create if not already present
if ! dmsetup status "${POOL_NAME}" &>/dev/null; then
  dmsetup create "${POOL_NAME}" \
    --table "0 ${LENGTH_IN_SECTORS} thin-pool ${META_DEV} ${DATA_DEV} ${DATA_BLOCK_SIZE} ${LOW_WATER_MARK}"
fi
sudo chmod +x /usr/local/bin/setup-devmapper-pool.shCreate a file at:
sudo nano /etc/systemd/system/devmapper-pool.service[Unit]
Description=Setup devmapper thin-pool for containerd
DefaultDependencies=no
After=local-fs.target
Before=containerd.service
[Service]
Type=oneshot
ExecStart=/usr/local/bin/setup-devmapper-pool.sh
RemainAfterExit=true
[Install]
WantedBy=multi-user.targetenable and start the script
sudo systemctl daemon-reexec
sudo systemctl daemon-reload
sudo systemctl enable devmapper-pool.service
sudo systemctl start devmapper-pool.serviceTest if it Works...
sudo dmsetup status
sudo losetup -a
❗ Configure Kata Containers with AWS Firecracker ❗
Do the following steps:
sudo find / -name "configuration-fc.toml" 2>/dev/nullIf I found the file e.g under:
/opt/kata/share/defaults/kata-containers/configuration-fc.toml#!/bin/bash
KATA_CONF_FILE=/opt/kata/share/defaults/kata-containers/configuration-fc.toml /usr/bin/containerd-shim-kata-v2 $@sudo cp /usr/share/defaults/kata-containers/configuration-fc.toml /etc/kata-containers/configuration.toml
sudo ln -sf /usr/share/defaults/kata-containers/configuration-fc.toml /etc/kata-containers/configuration.tomlTest it as following:
kata-runtime --version❗ Configure Containerd ❗
Next, we need to configure containerd. Add a file in your path (e.g. /usr/local/bin/containerd-shim-kata-fc-v2) with the following contents:
/usr/bin/containerd-shim-kata-fc-v2```
#!/bin/bash
KATA_CONF_FILE=/etc/kata-containers/configuration-fc.toml /usr/bin/containerd-shim-kata-v2 $@Note: You may need to edit the paths of the configuration file and the containerd-shim-kata-v2 to correspond to your setup.
Make it executable:
/usr/local/bin/containerd-shim-kata-fc-v2sudo chmod +x /usr/local/bin/containerd-shim-kata-fc-v2Lastly, edit the /etc/containerd/config.toml
[plugins]
  [plugins."io.containerd.grpc.v1.cri"]
    [plugins."io.containerd.grpc.v1.cri".containerd]
      default_runtime_name = "kata"
      [plugins."io.containerd.grpc.v1.cri".containerd.runtimes]
        [plugins."io.containerd.grpc.v1.cri".containerd.runtimes.kata]
          runtime_type = "io.containerd.kata.v2"
          privileged_without_host_devices = true
        [plugins."io.containerd.grpc.v1.cri".containerd.runtimes.kata-fc]
                runtime_type = "io.containerd.kata-fc.v2"

  [plugins."io.containerd.grpc.v1.cri".containerd.runtimes.kata.options]
    ConfigPath = "/opt/kata/share/defaults/kata-containers/configuration.>
        [plugins."io.containerd.grpc.v1.cri".containerd.runtimes.kata-clh]
          runtime_type = "io.containerd.kata-clh.v2"
  privileged_without_host_devices = true
  [plugins."io.containerd.grpc.v1.cri".containerd.runtimes.kata-clh.optio>
    ConfigPath = "/opt/kata/share/defaults/kata-containers/configuration->


[plugins.devmapper]
  pool_name = "devpool"
  root_path = "/var/lib/containerd/devmapper"
  base_image_size = "2GB"
  discard_blocks = true
Run Kata with Firecraker:
sudo nerdctl run --rm -it --snapshotter devmapper --runtime io.containerd.run.kata-fc.v2 alpine shRun Kata with QEMU:
sudo nerdctl run --rm -it --snapshotter devmapper --runtime=io.containerd.kata.v2 alpine sh(but only if the kata-manager.sh is configured to work with -S fc)
Check the Runtime with nerdctl:
for c in $(nerdctl ps -q); do
  echo "Container: $c"
  nerdctl inspect $c | grep -i runtime
  echo
doneBenchmark Execution
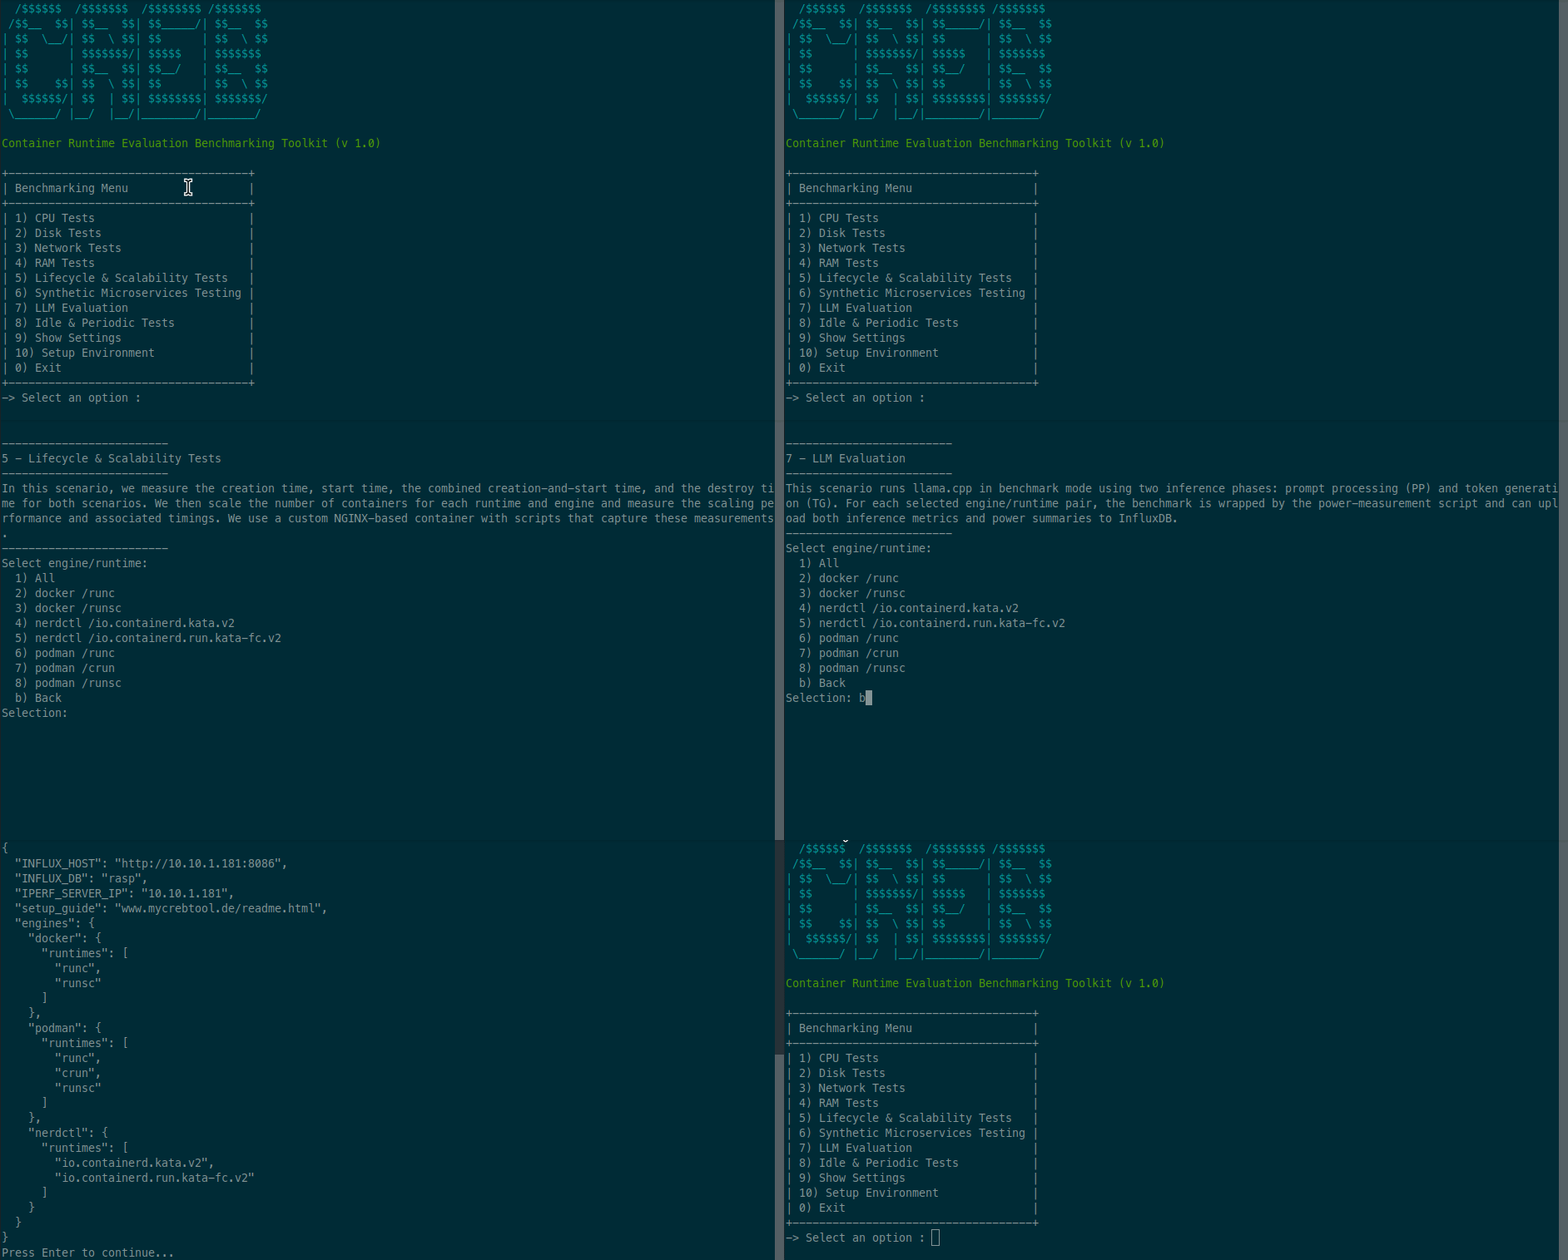
This guide can explain how benchmark scenarios are executed, which parameters are used, and how results are collected.
- CPU benchmark
- Disk benchmark
- Network benchmark
- RAM benchmark
- Lifecycle and scalability benchmark
- TeaStore Webstore
- LLM Inference
Benchmark-Server
In order for the complete benchmark environment to work as intended, a second machine is used to host several supporting containers. These containers are required for collecting measurement data, forwarding MQTT messages, storing time-series data, visualizing the results, and running specific benchmark scenarios.
The data flow follows a common monitoring pipeline: the Tasmota smart plug sends MQTT messages to the Mosquitto broker, Node-RED subscribes to the MQTT topics and processes the messages, InfluxDB stores the measurements as time-series data, and Grafana visualizes the stored values in dashboards.
The required containers are the following:
- MQTT broker: Mosquitto
- Node-RED
- InfluxDB v1.8
- Grafana
- iperf3 server
- Portainer
Exposed Ports
| Tool | Purpose | Exposed Port | Access Example |
|---|---|---|---|
| Mosquitto MQTT Broker | Receives MQTT messages from the Tasmota smart plug. |
1883/tcp 9001/tcp optional WebSocket |
mqtt://SERVER-IP:1883ws://SERVER-IP:9001
|
| Node-RED | Subscribes to MQTT topics, processes the messages, and forwards the data to InfluxDB. | 1880/tcp | http://SERVER-IP:1880 |
| InfluxDB v1.8 | Stores benchmark and power-consumption values as time-series measurements. | 8086/tcp | http://SERVER-IP:8086 |
| Grafana | Visualizes the measurement data stored in InfluxDB. | 3000/tcp | http://SERVER-IP:3000 |
| iperf3 | Acts as the server endpoint for TCP and UDP network benchmark scenarios. |
5201/tcp 5201/udp |
SERVER-IP:5201 |
| Portainer | Provides a web interface for managing Docker containers, images, volumes, and networks. | 9443/tcp | https://SERVER-IP:9443 |
Install Docker Engine
Before the supporting services can be started, Docker Engine must be installed on the second machine. The following commands install Docker on an Ubuntu-based system.
sudo apt-get update
sudo apt-get install -y ca-certificates curl

sudo install -m 0755 -d /etc/apt/keyrings

sudo curl -fsSL https://download.docker.com/linux/ubuntu/gpg \
  -o /etc/apt/keyrings/docker.asc

sudo chmod a+r /etc/apt/keyrings/docker.asc

echo \
  "deb [arch=$(dpkg --print-architecture) signed-by=/etc/apt/keyrings/docker.asc] https://download.docker.com/linux/ubuntu \
  $(. /etc/os-release && echo "${UBUNTU_CODENAME:-$VERSION_CODENAME}") stable" | \
  sudo tee /etc/apt/sources.list.d/docker.list > /dev/null

sudo apt-get update

sudo apt-get install -y docker-ce docker-ce-cli containerd.io docker-buildx-plugin docker-compose-plugin

sudo systemctl enable docker
sudo systemctl start docker
The Docker installation can be checked with:
sudo docker run hello-world
Optionally, the current user can be added to the Docker group so that Docker
commands can be executed without sudo.
sudo usermod -aG docker $USER
newgrp docker

docker run hello-world
Create a Docker Network
A dedicated Docker network is created so that the containers can communicate with each other by using their container names.
docker network create benchmark-netInstall and Run Mosquitto MQTT Broker
Mosquitto is used as the MQTT broker. The normal MQTT listener runs on port
1883. Port 9001 is included as an optional WebSocket
listener.
mkdir -p ~/mosquitto/config

cat > ~/mosquitto/config/mosquitto.conf <<'EOF'
listener 1883
protocol mqtt

listener 9001
protocol websockets

allow_anonymous true

persistence true
persistence_location /mosquitto/data/

log_dest stdout
EOF

docker volume create mosquitto_data
docker volume create mosquitto_log

docker run -d \
  --name mosquitto-server \
  --restart unless-stopped \
  --network benchmark-net \
  -p 1883:1883 \
  -p 9001:9001 \
  -v ~/mosquitto/config:/mosquitto/config \
  -v mosquitto_data:/mosquitto/data \
  -v mosquitto_log:/mosquitto/log \
  eclipse-mosquitto:2
Check whether Mosquitto is running:
docker ps
docker logs mosquitto-server
Exposed ports:
1883/tcp
9001/tcp
Install and Run Node-RED
Node-RED is used to subscribe to the MQTT topics from Mosquitto, process the incoming messages, and forward the measurement values to InfluxDB.
docker volume create node_red_data

docker run -d \
  --name node-red \
  --restart unless-stopped \
  --network benchmark-net \
  -p 1880:1880 \
  -v node_red_data:/data \
  nodered/node-red:latest
Check whether Node-RED is running:
docker ps
docker logs node-red
Exposed port:
1880/tcpNode-RED can be opened in the browser at:
http://SERVER-IP:1880Inside Node-RED, the MQTT broker address can be configured as:
mosquitto-server:1883Install and Run InfluxDB v1.8
InfluxDB v1.8 is used as the time-series database. The database name in this
example is rasp.
docker volume create influxdb_data

docker run -d \
  --name influxdb \
  --restart unless-stopped \
  --network benchmark-net \
  -p 8086:8086 \
  -v influxdb_data:/var/lib/influxdb \
  -e INFLUXDB_DB=rasp \
  -e INFLUXDB_HTTP_AUTH_ENABLED=false \
  influxdb:1.8
Check whether InfluxDB is running:
docker ps
docker logs influxdb
Exposed port:
8086/tcpOther containers in the same Docker network can reach InfluxDB by using:
http://influxdb:8086To open the InfluxDB command-line interface inside the container, use:
docker exec -it influxdb influxTo create the database manually, if it does not already exist, use:
CREATE DATABASE rasp;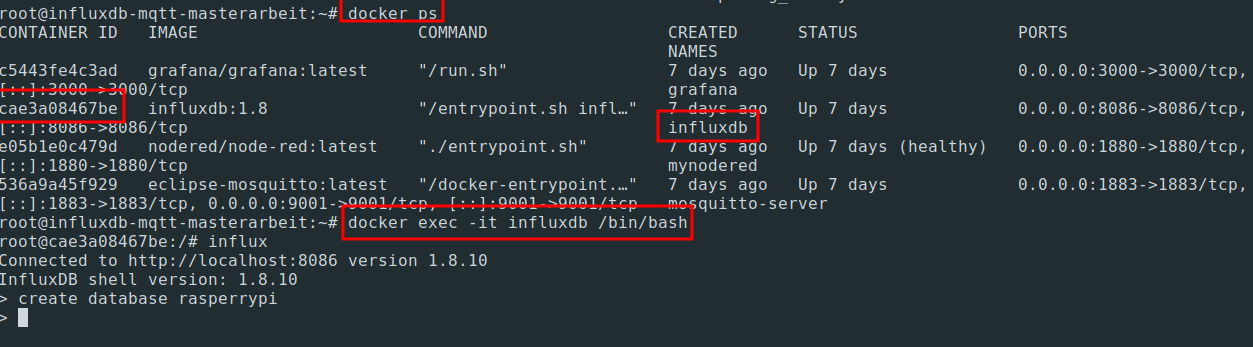
Install and Run Grafana
Grafana is used to create dashboards for visualizing the benchmark and power-consumption data stored in InfluxDB.
docker volume create grafana_storage

docker run -d \
  --name grafana \
  --restart unless-stopped \
  --network benchmark-net \
  -p 3000:3000 \
  -v grafana_storage:/var/lib/grafana \
  grafana/grafana:latest
Check whether Grafana is running:
docker ps
docker logs grafana
Exposed port:
3000/tcpGrafana can be opened in the browser at:
http://SERVER-IP:3000The default login is usually:
Username: admin
Password: admin
When adding InfluxDB as a data source in Grafana, use the container name as the database URL:
http://influxdb:8086The database name is:
raspAfter installing all the needed containers, the following video can help you with their configuration, so they can communicate:
Also a very helpfull tool for exploring the exposed values
MQTT-ExplorerInstall and Run iperf3 Server
iperf3 is used as the server component for the network benchmark scenario.
Both TCP and UDP traffic are exposed on port 5201.
docker run -d \
  --name iperf3-server \
  --restart unless-stopped \
  --network benchmark-net \
  -p 5201:5201/tcp \
  -p 5201:5201/udp \
  networkstatic/iperf3 \
  -s
Check whether iperf3 is running:
docker ps
docker logs iperf3-server
Exposed ports:
5201/tcp
5201/udp
Example TCP client command from another machine:
iperf3 -c SERVER-IP -p 5201Example UDP client command from another machine:
iperf3 -c SERVER-IP -p 5201 -u -b 1G -l 1400Install and Run Portainer
Portainer provides a web-based interface for managing Docker containers, images, volumes, and networks.
docker volume create portainer_data

docker run -d \
  --name portainer \
  --restart unless-stopped \
  -p 9443:9443 \
  -v /var/run/docker.sock:/var/run/docker.sock \
  -v portainer_data:/data \
  portainer/portainer-ce:lts
Check whether Portainer is running:
docker ps
docker logs portainer
Exposed port:
9443/tcpPortainer can be opened in the browser at:
https://SERVER-IP:9443Configure the Tasmota Smart Plug
On the Tasmota device, MQTT must be enabled and the IP address of the machine running the Mosquitto container must be entered as the MQTT server.
MQTT host: SERVER-IP
MQTT port: 1883
MQTT user: empty, if anonymous access is enabled
MQTT password: empty, if anonymous access is enabled
Check All Running Containers
After starting all containers, the running services can be checked with:
docker psThe expected containers are:
mosquitto-server
node-red
influxdb
grafana
iperf3-server
portainer
Expected Result
After the setup is complete, the second machine provides all supporting services required for the benchmark environment. The Tasmota smart plug sends MQTT messages to Mosquitto. Node-RED receives and processes these messages, InfluxDB stores the resulting time-series measurements, and Grafana visualizes the data in dashboards. In addition, iperf3 is available for network measurements, while Portainer can be used to manage the Docker environment through a web interface.